Saturday, May 29, 2010

Portable Waterstone Honing Station

Waterstones are messy. My old process was to pull the stone out of its bath, set it on a rubber mat and keep lots of towels handy to catch any runoff or build up of the slop. It really made sharpening a chore. I even looked at other systems, i.e., oil stones (Norton's tri-stone thingy that revolves), diamond stones and diamond paste. Not wanting to waste my investment, I researched as much as I could to find out the most sensible way of holding and containing waterstones. 

David Finck, author of Making and Mastering Wood Planes, shows a set up in his book. Basically, a cradle is made to hold the stone over a pan or container. The cradle is dadoed on either end to fit the lip of the pan or container. 

So I set off design something for myself, with David's setup as my model. The most obvious thing to me was that the less the stone had to travel from bath to cradle, the better. My setup had to definitely place the stone over the bath, thereby allowing the slop to run off the sides and into the container. 

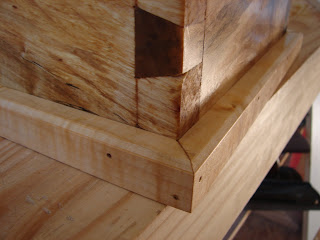
It had to be pleasing to my eyes. Simply setting the stone on a block over a piece of Tupperware did not sit well with me. But not wanting to go through the process of epoxy-coating the interior of a wooden box, so that it may hold water, I decided to build a box to hold the container. 

I'm still a very novice woodworker. This would give me a chance to practice some basic skills. A through-dovetailed box was the project. 


I wrestled with how to set in the bottom. I couldn't pass up the ease of just nailing it to the bottom edge. It will probably self destruct in the future, but, oh well; it looks and works nicely now.


The box begged to receive moulding along the bottom. Having no moulding planes at the moment, I just chamfered the edge. Box complete.


The cradle had to be of a rot-resistant wood. I had some redwood on hand, and just enough of it actually. The stock I had was only 5/8" thick, so I laminated two boards together, and the finished block is about 1 1/4" thick. After laying out the dadoes on either end, I sawed the lines and the waste, and cleaned it out with a chisel. The stops on the block were planed down to 3/8" in thickness, and glued to the face of the block. One stop had to have a slight angle cut on it to receive the wedge which holds the stone tight.


Two coats of boiled linseed oil —to bring out the color— and three coats of wipe-on poly followed up with a coat of wax finished it up. It hasn't been used yet; I expect it to get really dirty and wanted to take some pictures of it before it got to that point. The stone in the picture is a dry coarse stone; my honing stones are in the tub outside of the frame. The tub fits in tightly, too tightly. When I started this project I had planned on making a pond-liner covered box to insert. I'll still probably do that but this will work for the time being. 

I had never planned on this project getting this far. That's why I don't have any pictures of it in process. The soft maple used for the box was just scrap stuff I had laying around, and after finishing it I couldn't believe how much I loved the look of that maple. Some spalting, tiger stripes and other things going on. 


I'll be sure to post a couple of pics of it in use. This little station should help make my sharpening life easier. 

AMDG

Sunday, May 2, 2010

A Panel Gauge

Okay, so I've managed to finish a project.


This is a good project for scraps and cut-offs. Not a whole lot of wood is needed, save for the long piece for the arm. Mine is made out of quartersawn white oak. Use a hardwood that will wear well. I can provide the detailed measurements if you ask for them, but the project really is straightforward.


The pin is made from a drill bit. The smooth end was just filed to a point, an undersized hole was drilled, and the bit was driven home.


AMDG

Been Away for a While

It was brought to my attention that I have neglected to post anything for a long time. The truth is that, since going Neanderthal in the craft, I have had to learn a new art: sharpening. And this hasn't afforded me the opportunity to produce much in the way of woodworking. 

Power tool woodworking is a great way for someone to get started, particularly because of the age in which we live. Most of us do not have access to old world masters. The magazines and Norm have been our guides, and neither one of these are particularly partial to hand tool woodworking, although there does seem to be a growing interest. We can jump right in with power tools, and produce some beautiful pieces. 

Hand tool woodworking, on the other hand, requires, YES, REQUIRES, the craftsman to be skilled in the art of sharpening. This is what I have been devoting a good chunk of my time to. There are so many systems out there, I've had to dibble and dabble with what works best for me. The conclusion I have come to is that I want sharpening to be as quick and simple as possible. I haven't arrived there yet, though, but I am diligently working toward it.

One of these days I'll post about my sharpening system; what it is at the moment, anyway. This post is just to let you know why the blog has been dead.   

AMDG

Saturday, March 13, 2010

First Things First: The Essential Sawhorse

If I were to start woodworking from scratch, knowing what I know now, I would have to make sawhorses my first project. These workshop helpers are capable of providing the foundation on which you build your other workshop necessities, particularly, your workbench.

Sure, you could go and buy a pair. But why? They provide a wonderful opportunity to build some basic skills. And for the hand tool woodworker, you can build them to the key height for using them for their original intention: sawing.

Sawhorses can be found in varying shapes and sizes. I won't bore you with them; you can easily find them on the Internet. Instead, you can see mine, based on Adam Cherubini's. He built his from the log; I built mine from readily available construction lumber. The top piece is made from a 2x6 and the legs are cut from 2x2's.

As for basic sizing, my top piece is 25" long. The legs I cut long, 28", because I didn't know the splay angle of the legs. This length left me enough room to, once the sawhorse was complete, cut the legs down to 21". The height of the sawhorse should be about knee-level.

I built my first sawhorse outside, using the driveway and tailgate of my truck. The pictures show me cheating a little bit, using the first sawhorse to build the second. Its entirely possible, though, to build one without the other.


After cutting to length, drill the first leg hold with a brace and 1" diameter auger bit. Make sure you have a scrap backer board, to protect the bit upon exit and to reduce tear-out. 


Mark the length for one leg and cut it.


Mark the diameter of the peg on the end of the leg. Find the center and use a compass.


I roughed out the shape of the peg by splitting the corners off to almost the line. Then I used a spokeshave to round the end off.


After checking the fit and fine tuning, slide the peg in until its tight. Make sure to fit it so that some protrudes. You'll trim this off later.


Repeat the process for the remaining legs, using the first one as a guide. The legs need not have exactly the same splay. I eyeballed mine.


The finished horse. I didn't think to take pictures of the process of leveling the legs. First, you have to trim the pegs flush with the top. I used my handsaw and followed up with a block plane. Then turn the sawhorse over, make a mark on the edge-corner of one leg at the finished height, and use levels to transfer that mark onto two adjacent faces of the leg and then to the remaining legs. Then saw the legs to height, following the lines. You should end up with a sawhorse that sits reasonably level if not perfectly.


AMDG

Up and Running

Welcome to the blog for A.M.D.G. Woodworking. 

My name is John-Paul. I've been a hobbyist woodworker off-and-on for a decade or so. I used to think that woodworking meant getting to the end of the project as quickly and effortlessly as possible. Thus, my investment in power tools. How I wish I had that time and money back!

I guess I can't totally regret the power tools. They did get me started in the craft without having access to any teacher. Now I'm almost exclusively a hand tool woodworker. When I'm not learning and honing hand tool skills, I'm scouring eBay and other places for vintage, quality hand tools. 

Why hand tools? Well, I have been brought to the beauty of traditional Catholicism, so I guess traditional woodworking was the next logical step. Honestly, though, I sat in our parish church, St. Stephen in Cleveland, Ohio, and pondered the breathtakingly beautiful woodwork. 


I couldn't help but come to the conclusion that none of this was created with 3 1/4 hp routers, 12" compound miter saws, random orbit sanders or any of the other tools with tails found in the typical modern shop. This was craftsmanship at its best. By the way, all the statues in this church are hand-carved wood. 

So, my journey begins. Not to re-create the scene above, but to enjoy woodworking without all the dust, without all the noise, and without all the safety issues found with the use of power tools. Worth mentioning also is the space requirement. Anyone with a table saw knows you need x amount of infeed and outfeed room. My shop is in a spare bedroom; floor space is at a premium. Clearing out the power tools has left me with lots of room. And what if I want to work outdoors? Hand tools weigh less and are more easily transported. 

Oh, I forgot, I also like the process of working wood with hand tools, and its not for some sick love affair with the wood. There is just something more rewarding in chopping a mortise by hand or pushing a plane over the surface, hearing that familiar scrape and seeing a finished surface that requires very little-to-no extra work. I feel I am now working wood

The purpose of this blog is to record my progress, and to hopefully inspire you to either expand your craft if you are already a woodworker; to encourage you to pick up the craft; or to help you appreciate the beauty in hand-craftsmanship.

AMDG